Times Up… Let’s Deliver A Baby
Published (updated: ).
You know it’s coming when you see this….

The stages of labor
The process of giving birth is broken down into three main stages: labor, birth, and delivering the placenta. This is how a typical vaginal birth happens, although lots of other factors can influence each mom’s particular experience.
Stage One: Labor
Early Labor
Contractions begin and become more regular as the cervix begins to dilate (open) and efface (thin out). Most women are able to spend this time at home. This stage usually takes anywhere from about two to 24 hours, and by the end of it, the cervix is between four and six centimeters dilated.
Active Labor
At this point come the contractions. The contractions are three to five minutes apart and last for 30 seconds or more. This is the time when most mothers should be on their way to the hospital.
The contractions are likely quite painful at this point, and it’s important to remember that this pain is not a sign that anything is wrong. In fact, it means everything is coming along as it should. It’s a natural reaction to tense up in times of pain or worry, but doing so actually creates more work for the mother’s body and makes labor more difficult. Active labor usually lasts between four and eight hours, although it can be longer or shorter.
Transition
Near the end of active labor is a time called transition, the cervix opens from seven to a full 10 centimeters. It’s a short but intense time, when contractions are quite strong, coming every two to three minutes and lasting a minute or longer. The mother be shivering and shaking, alternating between feeling too hot and too cold, and feel nauseated or even vomit. This phase can last a few minutes or a few hours, and is usually faster if the mother has already had a vaginal birth.
Stage Two: Birth
At the end of transition, once the cervix has reached 10 centimeters dilation, the mother is ready to begin pushing. She’ll feel some pressure as if you need to have a bowel movement, followed by the urge to push. As the baby’s head starts to crown, the mother will feel the so-called “ring of fire,” and as the baby’s head emerges.
Stage Three: Delivering the Placenta
The good news is that the hard part is over. This final stage is just a few contractions to separate the placenta from the uterine wall, followed by a short and painless push. It takes from a few minutes to about half an hour. After delivering the placenta, the uterus will begin to tighten up and feel hard, which helps contract all the blood vessels and control bleeding.
Assemble Equipment

The good news is that there are many manufactures of clean OB equipment that are willing throw everything the ambulance crew needs to deliver the baby in a zip lock bag:
- 1 Pair Sterile Nitrile Exam Gloves
- 6 Sterile Gauze Sponges
- 1 Underpad
- 1 Sterile Bulb Syringe
- 1 Sterile Disposable Scalpel
- 2 Sterile Umbilical Clamps
- 1 Sterile O.B. Pad
- 2 alcohol preps, medium
- 1 Drape Sheet
- 1 Plastic Bag to Hold Placenta
- 1 Receiving Blanket
- 2 O.B. Towelettes
- 4 Disposable Towels
- 2 Twist ties
- 2 Nylon Tie-Offs
Deliver baby
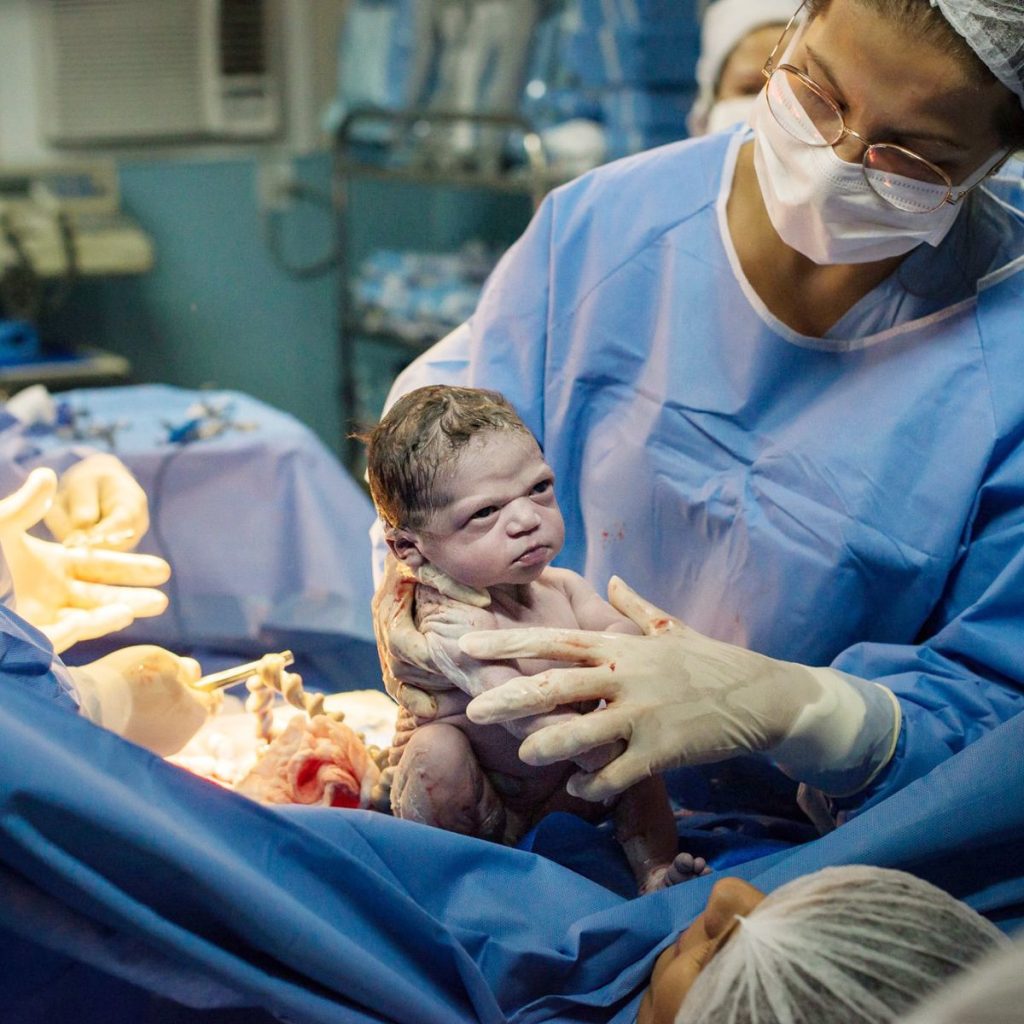
In case you didn’t get the hidden message from the inventory of the OB kit, delivering a baby is messy, wear gloves. Why stop at gloves? Wear everything; gown, goggle, mask, and gloves.
- Support the baby’s head as it is delivered – The baby won’t be breathing at this point. The chest has to be delivered first before any breathing takes place due to the fact that the fetus can’t breathe unless the chest is allowed to expand.
- If the umbilical cord is wrapped around the baby’s neck, slip it off gently (umbilical cords stretch and the baby is covered with afterbirth so it won’t be that difficult).
- Support the baby as he/she rotates.
- The upper extremity should deliver next as the head is guided downward – In order for the fetus to pass over the bones of the pelvis, the attitude of the baby will shift upward. This upward shift will allow a shoulder to be delivered. The other shoulder will be easier to deliver than the first.
- The feet should deliver after the shoulders. The torso is delivered pretty quick.
- Keep the head lowered so fluids can drain –
- Make note of the birth time – Knowing the time of birth is important as this will be recorded as the time and date printed on the baby’s birth certificate.
- Keep the baby level with the birth canal – The rationale is that the placenta is still draining into the baby. Using gravity helps facilitate this endeavor.
- Clamp and cut the cord – The cord should be clamped or tied off approximately 6 inches from the baby, then another 4 inches (10 inches from the baby). Giving 6 inches from the baby will allow the cord to be used by other healthcare provider in the continuum of care. Cut the cord with the included scalpel or use a pair of trauma scissors.
- Assesses the newborn – Minimally, look for activity. If the activity level is good (active, moving arms and legs and crying), then no further assessment is needed.
- Wait for the afterbirth – This doesn’t have to be completed on the scene. The mother can deliver the afterbirth on the way to the hospital. It could take hours for the placenta and all the afterbirth to be delivered.
Care for the mother
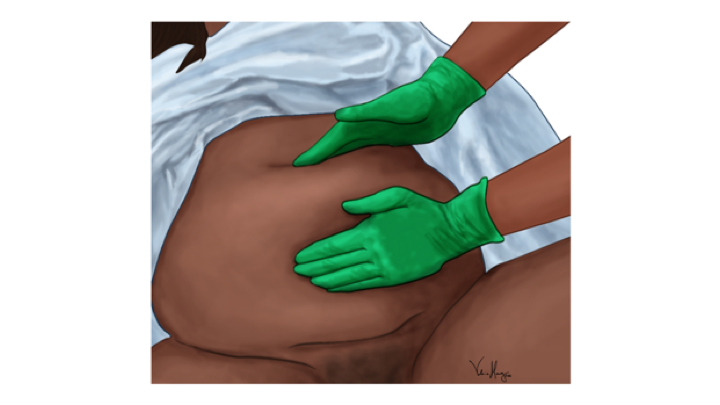
Some bleeding will be normal for the mother. Bleeding should be minimal and only need a place to drain into a sanitary pad placed over the vaginal opening. If the bleeding is more than expected, a fundal massage may be required. The fundal massage is executed by finding the uterus (softball shaped ball under the fundus (part of the abdomen where the baby was previously located). More times than not, the baby is hungry. Feeding the baby by letting the mother breastfeed not only satisfies the baby (neonate or newborn), but also aids in bleeding control.
